

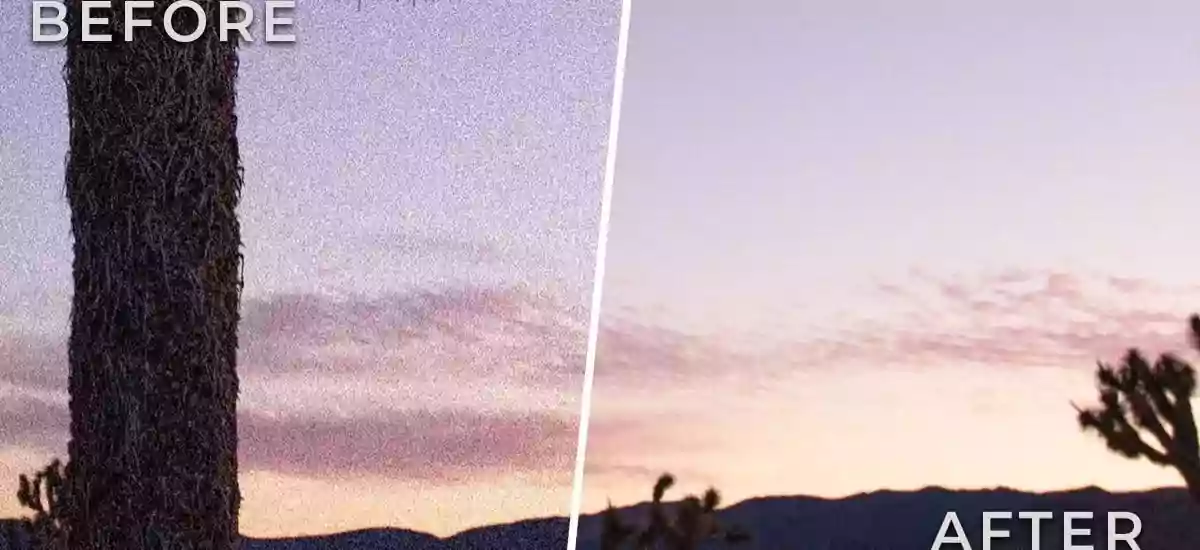
You got grainy Photos that you wish to make look spotless? Boisterous pictures regularly look delightful in case you are going for the vintage look.
Yet, as a rule, picture clamor for the most part winds up destroying the nature of the picture. Grain impact is one of the regular tests encountered by photographic artists and editors, regardless of whether experts or novices.
Mostly, it does not influence the image quality yet when you zoom in; the photograph gives off an impression of being grainy with little specks on top of it.
Hence, this guide will help you understand two things: firstly why you encounter the grainy effect on your pictures, and second, how to fix grainy photos using with or without Photoshop software, and Lightroom. So, read on!
WHY ARE MY PHOTOS SO GRAINY?
There can be several causes that make your photographs grainy. These incorporate different photography perspectives like ISO, screen speed, camera details, aperture, or camera exposure. The following are the most elemental reasons why your photos turn grainy:
- Light Condition: without enough light, the photos turn grainy. For instance, if your shot is taken at nightfall or in a dim room, you could not deal with a legitimate low aperture, higher ISO proportion, or if you turned on the flash. In such cases, your photographs get grainy.
- ISO: A straightforward standard is that the more noteworthy the ISO of your camera is, the more the clamor or grains in the image will be. Expanding ISO is regularly a need when shooting in low light or around evening time. It is for you to choose how much the noise is mediocre to not ruin the sharpness and by and large nature of the picture.
To place it in basic words, ISO in photography is the affectability of your camera’s imaging sensor to the light. On the off chance that you are utilizing very good quality expert cameras, they are intended to deliver insignificant or immaterial noise even at a higher ISO of 3000.
Some most recent advanced cameras are likewise ready to oversee picture quality with the least noise up to ISO 1000.
Camera Type: If the issue of the grainy photographs is diligent with your particular camera, this implies your camera has a little sensor. It is not adequately delicate to capture in low light conditions.
This is normally a grumbling with some simple-to-use cameras, low-end DSLR, and cell phone cameras. Two principal parts in cameras reason the grainy impact in photos:-
Digital Noise: Your sensor changes light over to electricity. Furthermore, when it is dim, it should make those signs more grounded to make the right exposure. All the while, the aberrations in the yield wind up making grainy photographs given digital noise.
Shot Noise: there is additionally shot noise. This kind of noise does not have anything to do with your camera. All things considered, it is the light entering your camera that makes it.
Light is comprised of photons. Furthermore, they all move from the light source to your camera at different paces. Thus, you will wind up seeing little and dim spots that make grainy photographs.
HOW CAN I FIX GRAINY PHOTOS WITHOUT PHOTOSHOP?
Presently you would be pondering, how to make a picture less pixelated? How would you fix or limit the noise in your photographs? There are a couple of tried and true ways you can fix grainy pictures without decreasing noise in Photoshop. We will tell you the best way to utilize every one of them underneath.
Set Your Camera To A Low ISO
Keep your ISO as near 100 as possible. There will be times where you end up capturing inside, and you need a higher ISO. Alter your aperture first, and afterward, your screen speed (most extreme 1/60 without a mount/divider) to keep your ISO low.
If you end up in a low light circumstance, you can likewise utilize various approaches to support the light. For example, you can search for brilliant regions to capture as opposed to remaining in faintly lit areas.
You can likewise set your camera to meter on the lighter spaces of the picture. Doing so guarantees that the camera does not overextend itself in catching the darker regions.
Overexpose Your Images
One stunt to fix grainy photographs is to overexpose your picture somewhat. One-stop ought to be sufficient. Doing so limits the grain during the post-preparing stage. At the point when you come to build the aperture, it will decrease the advanced noise moreover.
On the off chance that you need to attempt this technique, abstain from overexposing by utilizing a high ISO. Doing so will just expand the clamor in your photographs. It is ideal to bring down the screen speed or broaden the aperture all things considered.
Simply recall that overexposing your photographs can have a few results. If you blow your pictures, you will wind up losing a great deal of detail you cannot bring back in post-creation.
Also, if you set the sluggish screen speed, you may wind up with motion obscure. So be cautious while applying this strategy. Possibly use it when it is fundamental.
Turn On Your Camera’s Noise Reduction
Numerous advanced cameras presently highlight worked in noise decrease to help you fix grainy photographs without altering them. Every camera has its method of allowing you to decrease grain.
By and large, you can discover it on the menu. At the point when you turn on the element, the camera would consequently dispose of the grain for you.
Cameras also frequently offer different degrees of noise decrease to fix grainy photographs. You can set it to low, medium, or extreme. We suggest you just utilize either low or medium. Setting this element to high might decrease the subtleties in your photographs.
Utilize Raw Instead Of JPEG
Noise decrease possibly works with JPEG photographs and is not generally pragmatic if you need to fix clamor. So if you need more control, you are in an ideal situation turning it off and utilizing RAW.
Picking RAW would permit you more control when you lessen noise in Photoshop or Lightroom. Since the record is editable, you can make a ton of changes without destroying your photographs.
Furthermore, when every one of the strategies we just referenced falls flat, at that point you can utilize RAW to diminish noise in Photoshop consistently.
HOW TO FIX GRAINY PHOTOS IN PHOTOSHOP
Adobe Photoshop is photograph-altering programming that can fix your grainy pictures somewhat. Albeit complete noise evacuation probably will not be attainable with Photoshop, yet you will be able to fix the pictures somewhat. It has this inherent feature that can lessen clamor. To utilize Noise Filter in Photoshop, follow the steps beneath:
- In the first place, open the picture in Photoshop. Go to Filter>Noise>Photoshop to decrease noise.
- In the Reduce Noise spring-up window, you will see ‘Strength’, ‘Save Details’, ‘Lessen Colour Noise’, and ‘Hone Details’.
- Change the three sliders until you fix the picture.
- As should be obvious, raise the ‘Strength’ from 6 to 10, diminish the ‘Shading Noise’ to 100%, and pull the ‘Hone Details’ to 0%, hypothetical example.
- Then you will be able to view the picture after the noise decrease. You should press the ‘Eliminate JPEG Artifact’ to see the review.
- Finally, tap on ‘OK’ and save the edited image.
HOW TO REMOVE GRAIN IN LIGHTROOM
Lightroom is an incredible device you can use to fix grainy photographs. It has a committed adjustment board for expanding and diminishing the detail in the pictures. Follow the means under to decrease noise by using the Lightroom programming:
- Open the picture in the Lightroom application.
- Go to the Develop module of Lightroom
- Open the Detail Panel.
- On the left sheet under Noise Reduction, you will see Colour and Luminarc.
- Start with Luminarc and change the given clamor decrease bars – Detail and Contrast, until you get palatable grainy picture revision. Additionally, change the sliders under other features to see how it affects your image.
- The progressions can be seen on the right sheet. When done, save the altered photograph.
Lightroom is viable in fixing the grainy and sandy defilements of the photographs. In any case, the downside is that the amendment is applied to the entire picture and not simply the grainy region on the photograph. This may upset the primary settings of your photograph.
FREQUENTLY ASKED QUESTIONS
What Is Grain?
The photographic film you use for simple photography has silver precious stones in its emulsion covering to make it delicate to light. The more silver halide precious stones an emulsion contains, the more delicate it is to light. What is more, ISO is how picture takers measure a film’s capacity to capture light.
Some time ago, the ISO esteems went from ISO 25 to ISO 3200. ISO 25 has a minimal measure of silver, making it ideal for use in brilliant sunlight.
In the meantime, the higher reaches, for example, 3200, have more critical bits of silver that let it capture low degrees of light. A lot of silver makes the photographic film simple to use in low-light conditions. And yet, they likewise make grain or noise in your photographs.
How Important Is ISO?
Recall what the measure of silver on the film means for the size of the grain in your picture? From multiple points of view, a comparable wonder occurs with advanced cameras.
Nowadays, advanced camera frameworks utilize the ISO. However, rather than utilizing silver particles, it presently has a light sensor to help it capture light. A lower ISO setting, for example, 100 or 200 will downplay the grain. Furthermore, like with film, ISO 3200 or above makes a lot of grain.
What Is a Suitable Subject For a Grainy Photo?
Fine detail will presumably get annihilated by hefty grain so scenes with that ought to be kept away from. Solid shapes, close-ups of faces, individuals, and structures would all be acceptable subjects. Pick a subject and lighting that will create some great mid-tones and delicate shadows.
The unadulterated high contrast regions battle to yield a lot of stout grain during a quicker shutter speed, so keep away from a picture that will be made out of enormous spaces of dark or white differentiation.
Pick a scene that will be escalated by the touchiness that high grain confers. An abrasive metropolitan scene, burial grounds, chapels, destroyed structures, despairing scenes, rusting apparatus, desolate spots, despair, confinement, frightening places, and so forth.
What Iso Should You Use To Capture A Grainy Photo?
You should choose a higher ISO number to promise some noticeable grain. High ISO settings power the gatherings of pixels into bigger groups to build the enhancement of light that has hit the sensor.
The goal and lucidity of the picture are debased by the gathering impact causing graininess because of the abnormality of pixels around the groups. In computerized photography, this is called noise and this can assist with accomplishing the grainy glance at high ISO numbers.
Would It Be A Good Idea To Use Flash To Capture A Grainy Photo?
Utilizing a flash for the most part will destroy any opportunity of considering any to be grain as the incredible light source can produce a bounty of reflected light for the sensor of the camera to measure without enhancement.
Streak delivers brilliant, sufficiently bright lively scenes that are something contrary to the testy, sensational arrangements that suit grainy photos the best. So no, do not utilize flash.
CONCLUSION
So, that was all on how to fix grainy photos. There is no magical way to evacuate graininess completely; however, the above-mentioned ways can at least alter it a little bit. We hope this article was resourceful for you. Until next time!
Read More: 10 Steps To Install A Wifi Connection In Your Home